In this article, I am going to show you how to fix if Windows 10 taskbar not working using some simple methods. First of all, it is not just one issue that can occur with the taskbar. Sometimes the whole taskbar doesn’t work, other times you can’t pin something to the taskbar, then right-click on taskbar doesn’t work, the list goes on. So the methods that I am providing here will fix all of the issues with the taskbar. Also, Read: How to Fix USB Drive Not Showing In Windows 10
Fix if Windows 10 Taskbar Not Working
By Performing a Restart
For most times, anything functioning poorly all of sudden on your computer has a lot to do with a faulty start-up and you can easily fix that problem by restarting your computer. So definitely give it a try to fix if Windows 10 taskbar not working.
Clean Out Unnecessary Space on the Taskbar
If you pay attention, there is a lot of wasted space on the Windows 10 taskbar. For example, the Windows search feature and Cortana take a lot of space and it is quite unnecessary too. You can hide them and save some space. To do that, Step 1: Go to the Windows 10 Taskbar. Step 2: Right-click on an empty space. Step 3: Uncheck the ‘Show Cortana button’ option to hide it. Step 4: In the ‘Search’ menu, select ‘Show Search icon’ if you use the feature or you can just select ‘Hidden’ if you do not use the search option. That will free up a lot of space on your taskbar. Along with that, also remove the unused apps from the taskbar.
By Restarting the Windows Explorer Process
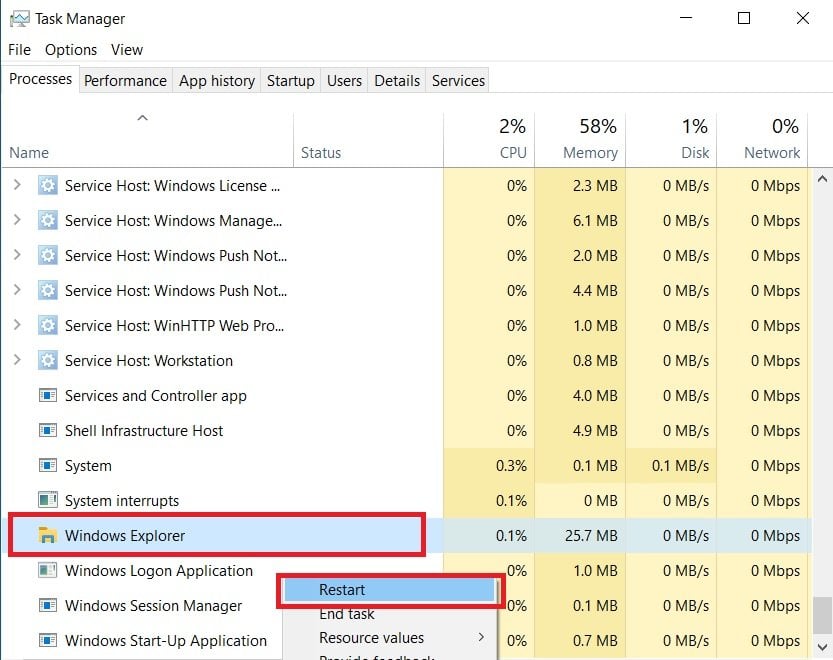
Step 1: Press ‘ctrl+alt+delete’ keys on your computer. Step 2: Click on the ‘Task Manager’ to open it. Step 3: Under the ‘Processes’ tab, navigate all the way down and select ‘Windows Explorer’ Step 4: Right-click on it and select ‘Restart’. That’s it and let the Windows Explorer process restart and you shall be good.
Keep Your Windows Updated
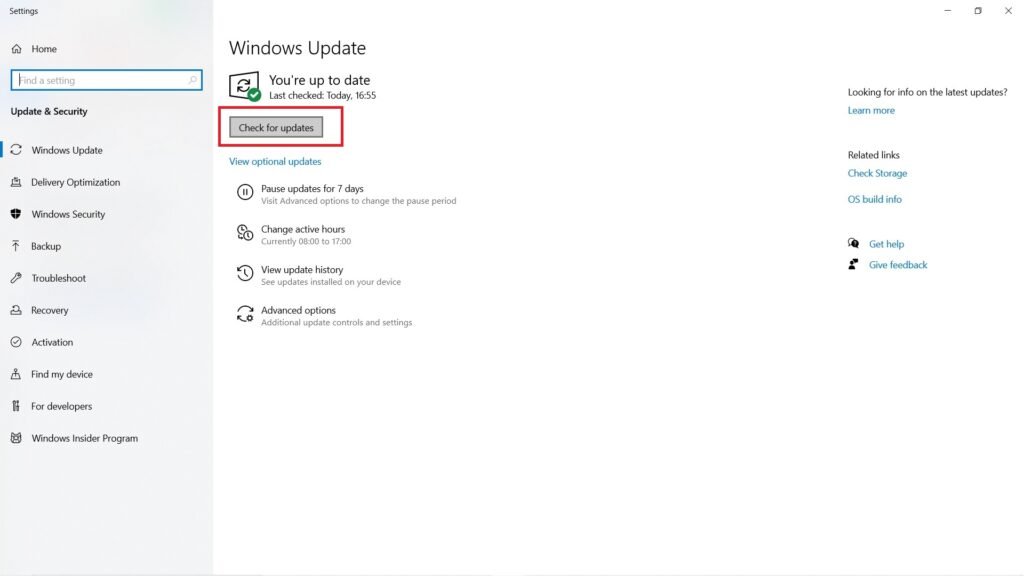
Keeping your Windows 10 up to date is very important as the Windows 10 taskbar not a working issue that might be caused due to some faulty driver and the updates will fix that. All you have to do is go to the Windows search bar, and search for “Windows updates”, and hit enter. Now you will see the Windows 10 updates page, just click on ‘Check for updates’ and download the latest updates.
Using Powershell to Re-register the Taskbar
For this, we will be using the Windows PowerShell command-line tool which is very powerful and used to configure system settings and automate Windows tasks. Now, we suggest that you create a restore point before trying this in case something goes wrong. Step 1: Go to the Windows search bar, type “Windows PowerShell”, right-click on it to ‘Run as administrator’. Step 2: Once you get to the PowerShell window, type the following command: , and hit enter. Step 3: Once, this command is successfully executed, go to the following path C:>Users>name>AppData>Local. Step 4: Search for the file named “TileDataLayer” in the list. When you find it, select it and delete it. Step 5: If you are unable to delete this file, go to the Windows search bar, type “Services”, and hit enter. Then look for the “Tile Data model” server service and stop it. Step 6: Now again try deleting that file mentioned in Step 4. That’s it and now your taskbar should work quite fine.
Using the SFC Feature
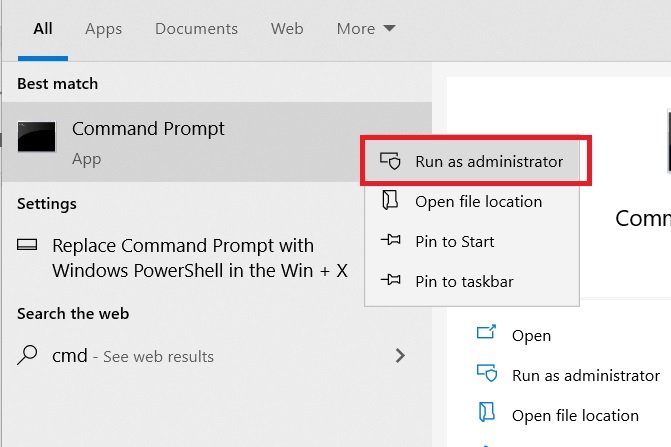
This is also one of the potential fixes for your problem. Here is how you can use the System File Checker tool: Step 1: Go to the Windows search bar, type “cmd”, right-click to ‘Run as administrator’. Step 2: Now in the command prompt window, type the following command: , and hit enter. Let the scan complete, it will replace your faulty or corrupted files with fresh ones and you shall not see the issue again.
Using DISM Tool
DISM tool is another great tool like SFC scan and it might help you. Here is how to run the command: Step 1: Go to the Windows search bar, type “cmd”, right-click to ‘Run as administrator’. Step 2: Now in the command prompt window, type the following command: , and hit enter. Let the scan complete, it will replace your faulty or corrupted files with fresh ones and you shall not see the issue again.
By Creating a New Account
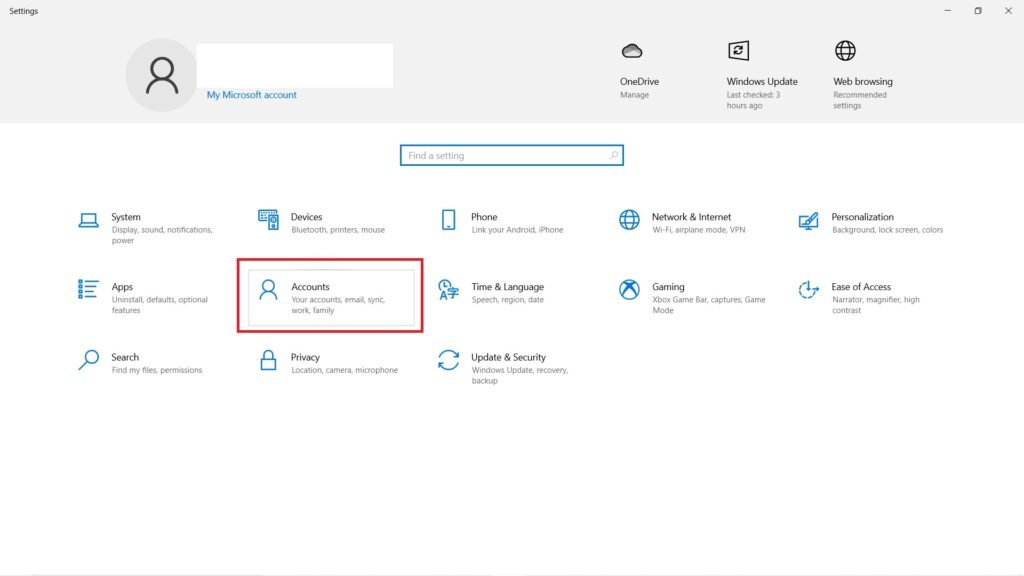
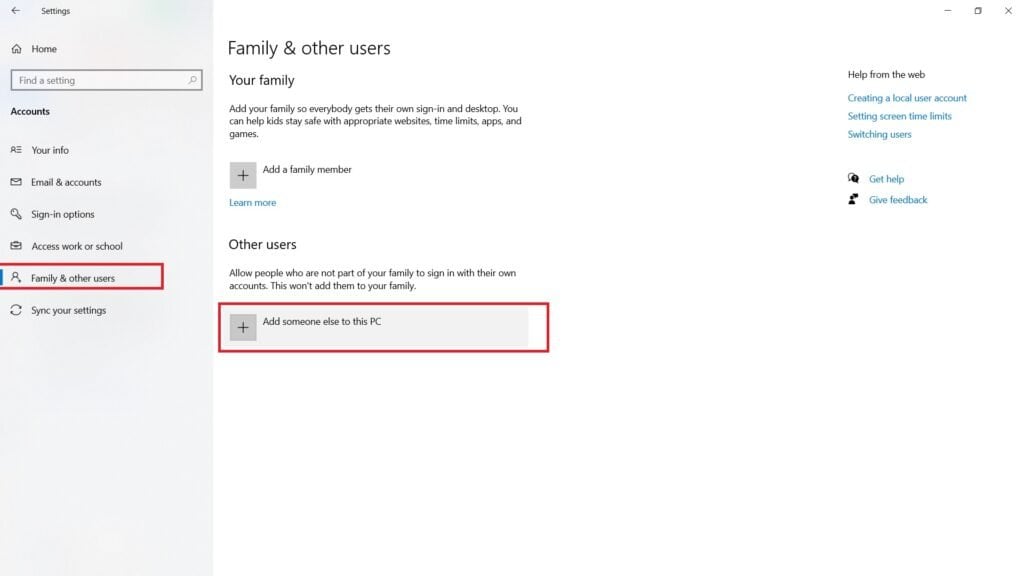
If you are one of the people who do not want to get into the cycle of using various methods to fix if Windows 10 taskbar not working then this might be an easy fix for you. Step 1: Go to the Windows search bar, type “Settings”, and hit enter. Step 2: Now click on ‘Accounts’. Step 3: Now click on ‘Family & other users’ from the menu on the left. Step 4: Click on ‘Add someone else to this PC’. Create a new account, sign out and then sign in using the new account to see if the error is fixed.
By Starting the Application Identity Service
Step 1: Go to the Windows search bar, type “Services” and hit enter. Step 2: From the list, select the service named ‘Application Identity’. Step 3: Click on ‘Start’ to start the service from the menu on the left side. This should fix the problem.
By Performing a Clean Reset
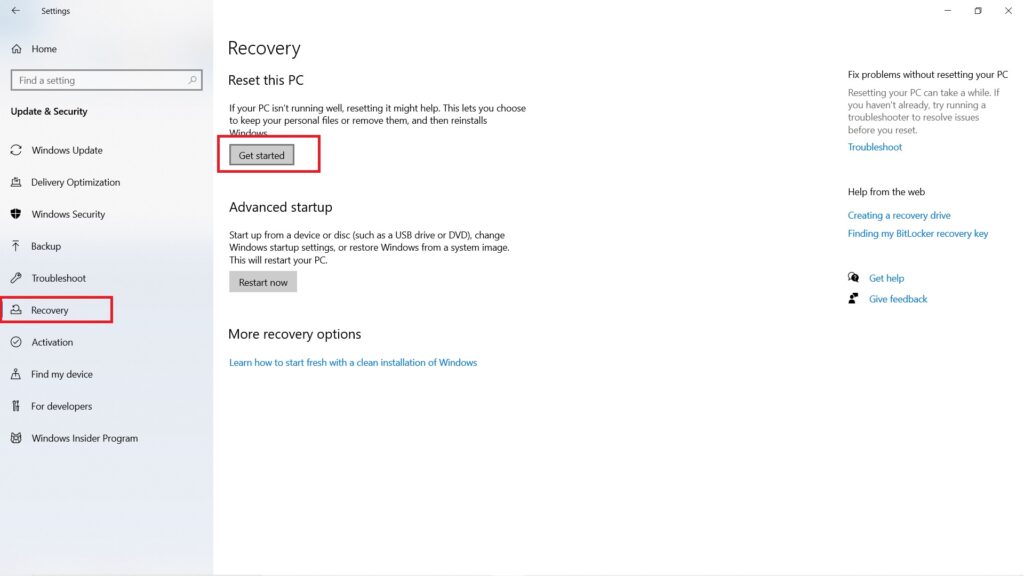
This is the last option for you to fix if Windows 10 taskbar not working. Before you reset your computer, make sure to take a backup of your important files and folders. Here is how you can do it: Step 1: Go to the Windows search bar, type “Settings”, and hit enter. Step 2: Click on ‘Update & Security’. Step 3: From the left side menu, navigate to ‘Recovery’. Step 4: Click on ‘Get started’ under the “Reset this PC” option. Follow all the on-screen instructions to reset your computer.
Conclusion
So that was all about how to fix if Windows 10 taskbar not working. I hope some of the methods will help you to fix the issue. If you face any difficulty, feel free to reach out to us. Also, Read: How to Fix if Nvidia Control Panel Missing in Windows 10




title: “How To Fix If Windows 10 Taskbar Not Working " ShowToc: true date: “2022-12-11” author: “Maria Smith”
In this article, I am going to show you how to fix if Windows 10 taskbar not working using some simple methods. First of all, it is not just one issue that can occur with the taskbar. Sometimes the whole taskbar doesn’t work, other times you can’t pin something to the taskbar, then right-click on taskbar doesn’t work, the list goes on. So the methods that I am providing here will fix all of the issues with the taskbar. Also, Read: How to Fix USB Drive Not Showing In Windows 10
Fix if Windows 10 Taskbar Not Working
By Performing a Restart
For most times, anything functioning poorly all of sudden on your computer has a lot to do with a faulty start-up and you can easily fix that problem by restarting your computer. So definitely give it a try to fix if Windows 10 taskbar not working.
Clean Out Unnecessary Space on the Taskbar
If you pay attention, there is a lot of wasted space on the Windows 10 taskbar. For example, the Windows search feature and Cortana take a lot of space and it is quite unnecessary too. You can hide them and save some space. To do that, Step 1: Go to the Windows 10 Taskbar. Step 2: Right-click on an empty space. Step 3: Uncheck the ‘Show Cortana button’ option to hide it. Step 4: In the ‘Search’ menu, select ‘Show Search icon’ if you use the feature or you can just select ‘Hidden’ if you do not use the search option. That will free up a lot of space on your taskbar. Along with that, also remove the unused apps from the taskbar.
By Restarting the Windows Explorer Process
Step 1: Press ‘ctrl+alt+delete’ keys on your computer. Step 2: Click on the ‘Task Manager’ to open it. Step 3: Under the ‘Processes’ tab, navigate all the way down and select ‘Windows Explorer’ Step 4: Right-click on it and select ‘Restart’. That’s it and let the Windows Explorer process restart and you shall be good.
Keep Your Windows Updated
Keeping your Windows 10 up to date is very important as the Windows 10 taskbar not a working issue that might be caused due to some faulty driver and the updates will fix that. All you have to do is go to the Windows search bar, and search for “Windows updates”, and hit enter. Now you will see the Windows 10 updates page, just click on ‘Check for updates’ and download the latest updates.
Using Powershell to Re-register the Taskbar
For this, we will be using the Windows PowerShell command-line tool which is very powerful and used to configure system settings and automate Windows tasks. Now, we suggest that you create a restore point before trying this in case something goes wrong. Step 1: Go to the Windows search bar, type “Windows PowerShell”, right-click on it to ‘Run as administrator’. Step 2: Once you get to the PowerShell window, type the following command: , and hit enter. Step 3: Once, this command is successfully executed, go to the following path C:>Users>name>AppData>Local. Step 4: Search for the file named “TileDataLayer” in the list. When you find it, select it and delete it. Step 5: If you are unable to delete this file, go to the Windows search bar, type “Services”, and hit enter. Then look for the “Tile Data model” server service and stop it. Step 6: Now again try deleting that file mentioned in Step 4. That’s it and now your taskbar should work quite fine.
Using the SFC Feature
This is also one of the potential fixes for your problem. Here is how you can use the System File Checker tool: Step 1: Go to the Windows search bar, type “cmd”, right-click to ‘Run as administrator’. Step 2: Now in the command prompt window, type the following command: , and hit enter. Let the scan complete, it will replace your faulty or corrupted files with fresh ones and you shall not see the issue again.
Using DISM Tool
DISM tool is another great tool like SFC scan and it might help you. Here is how to run the command: Step 1: Go to the Windows search bar, type “cmd”, right-click to ‘Run as administrator’. Step 2: Now in the command prompt window, type the following command: , and hit enter. Let the scan complete, it will replace your faulty or corrupted files with fresh ones and you shall not see the issue again.
By Creating a New Account
If you are one of the people who do not want to get into the cycle of using various methods to fix if Windows 10 taskbar not working then this might be an easy fix for you. Step 1: Go to the Windows search bar, type “Settings”, and hit enter. Step 2: Now click on ‘Accounts’. Step 3: Now click on ‘Family & other users’ from the menu on the left. Step 4: Click on ‘Add someone else to this PC’. Create a new account, sign out and then sign in using the new account to see if the error is fixed.
By Starting the Application Identity Service
Step 1: Go to the Windows search bar, type “Services” and hit enter. Step 2: From the list, select the service named ‘Application Identity’. Step 3: Click on ‘Start’ to start the service from the menu on the left side. This should fix the problem.
By Performing a Clean Reset
This is the last option for you to fix if Windows 10 taskbar not working. Before you reset your computer, make sure to take a backup of your important files and folders. Here is how you can do it: Step 1: Go to the Windows search bar, type “Settings”, and hit enter. Step 2: Click on ‘Update & Security’. Step 3: From the left side menu, navigate to ‘Recovery’. Step 4: Click on ‘Get started’ under the “Reset this PC” option. Follow all the on-screen instructions to reset your computer.
Conclusion
So that was all about how to fix if Windows 10 taskbar not working. I hope some of the methods will help you to fix the issue. If you face any difficulty, feel free to reach out to us. Also, Read: How to Fix if Nvidia Control Panel Missing in Windows 10


